If you’ve just lost your messages and photos on your iPhone 13 or looking for a solution in case of such events, read closely. This article provides information on how to recover deleted messages on your iPhone 13 as well as how to recover deleted photos from iPhone 13.
As the iPhone 13 makes its way into the hands of users worldwide, there will be different reactions to Apple’s latest flagship. If you’re an existing iPhone user looking to upgrade, you should pay attention to your data transfer process to avoid losing important messages, pictures, videos, and other media files.
Experienced iPhone users know what is required to transfer data from one device to another. Those who don’t know; risk losing their information during the phone upgrade process.
The worst thing that can happen to an iPhone user is losing images, videos, and messages without a means of retrieving them.
Thankfully, there are existing solutions to help recover deleted messages and photos from iPhone 13. However, before we review the best ways to recover deleted messages and photos from your iPhone 13, let’s look at some common actions that can erase your information.
How photos and messages are erased from your iPhone 13
Apple devices are built to last and don’t just self-erase data without an external cause. So if your messages or photos are missing from your iPhone 13, it may be because you upgraded the device, accidentally deleted data, or jailbreak the device.
Jailbreak your iPhone: For those who don’t know, jailbreaking an iPhone is the same as rooting an Android device. In both cases, the restrictions imposed by the manufacturer are removed without permission. When you jailbreak your phone, some apps may stop working. Also, your device will be exposed to any type of malicious software that can steal or corrupt your data. Generally, it is not advisable to jailbreak your device.
iOS upgrading: Your media files and messages could become inaccessible after upgrading your device. Typically, this is a temporary situation. You should be able to access your files after the upgrade is complete and you’ve rebooted the device.
Mistakenly deleting your data: Well, this can happen to the best of us. You could sleep off while watching your favorite video and accidentally delete the video. Also, deleting files in the heat of emotion also falls under accidentally deleting your data.
How to recover deleted messages and photos from iPhone 13
Whether you accidentally deleted your messages and media files or lost them to an ill-advised jailbreak, you can still save the situation with one of these solutions.
Recover photos and messages from iTunes
Method 1: Retrieve pictures and videos from iTunes.
You can recover lost images and videos from iTunes to your iPhone 13. That is possible because when you set up an iCloud ID on your iPhone, your mobile contacts and photographs or videos are automatically backed up to the iTunes server. So when you need to restore lost images or messages, you can restore them from your iTunes account.
Step 1: From your computer, open and log in to your iTunes account.
Step 02: Connect your mobile device to your PC using the data cord.
Step 03: After connecting the phone to the computer, use iTunes to pick the device that displays on the screen.
Step 04: Next, click the “Restore Backup” button.
Step 05: You will see a list of backups of your mobile phone with different dates. Select the most convenient date for you.
Step 06: The data will take a few minutes to be restored.
Step 07: Your iPhone will restart after the data has been restored. Once the restart is complete, it will sync. When the sync procedure is finished, remove your iPhone from the computer.
Method 2: Retrieve images and videos from iCloud
Step 1: You can also retrieve lost content from your iCloud account. If you opened an account on the storage platform and engaged the app, you should have a backup in your account. To get your data restored, use your computer’s browser to visit the iCloud website.
Step 02: Sign in to your account.
Step 3: Select the “settings” option.
Step 04: Scroll down and select the Restore option in the advanced section.
Step 05: A second window for the Restore portion will appear, displaying a list of backups of the deleted data. Here, too, you must select the backup with the most recent date and then select the Restore option.
Step 06: This will take a few minutes and will display the completion notification once you restore. Next, unplug your mobile phone from the PC.
Recovering your lost data without a backup
You may be in this position right now. Losing your data without a backup to restore from would mean permanent data loss. However, if you have the right tools, like Dr.Fone – Data recovery (iOS), you can always get back lost information in several clicks.
There are several advantages to utilizing this toolkit. However, the primary benefit is that the app supports data backup from your computer or mobile phone device. Here are detailed instructions for recovering lost photographs and videos from your iPhone 13 with Dr.Fone – Data recovery (iOS).
Step 1: First, download and install Dr.Fone – Data Recovery on your PC or MAC operating system.
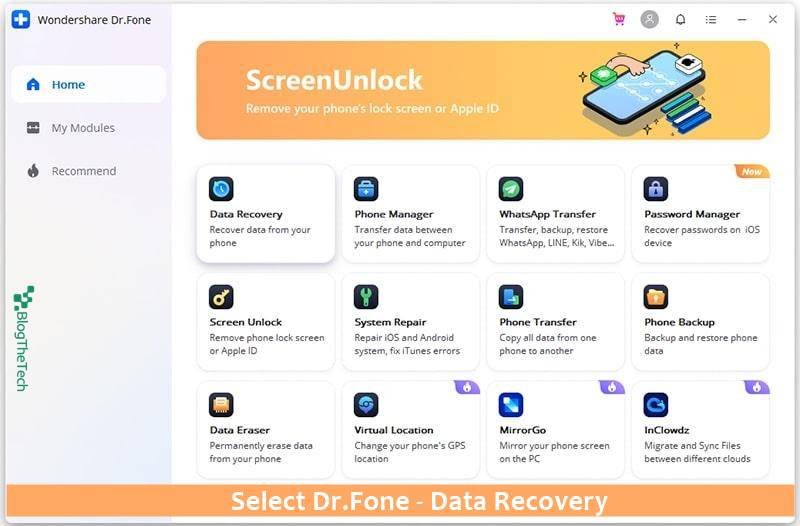
Step 02: When you open this program, it will prompt you to connect your device to the computer via a data cable. Kindly connect your smartphone to your PC.

Step 3: After connecting your phone to the computer, select the data recovery option to recover your data. The app will scan your phone for deleted data and show them to you.

Step 04: Next, save the recovered files to your PC. When this procedure is finished, and your files have been transferred to your iPhone, unplug your phone from the computer.
It is that simple. And You’re welcome.
Conclusion
Dr.Fone – Data Recovery is a great tool for recovering deleted photos and messages from iPhone 13. It works best when you’ve not overwritten the lost information with other information like other data recovery apps. In other words, don’t add new information to your device when you notice that your data has been erased. First, download Dr.Fone to restore the old information before adding new data to your device.