It is stressful to see the error message “The SD card is write protected” when you want to save data, delete or change files on the miso SD card. You are suggested to figure out why your SD card is write-protected. Perhaps you made the card read-only by mistake, or the SD card has physical damage and/or logical errors. In order to remove write protection from micro SD card, you could try the 5 methods below on Windows 10 computer, when that is done, you could write data normally. Related article: How to recover deleted files from sd card with easy steps.
Method 1. Use Diskpart to Remove Write Protection from SD Cards
Diskpart is a Windows built-in command-line tool that empowers you to manage your computer disk. By following the tutorial, Windows 10 users can remove the write protection attribute from the micro SD card using CMD, and then add new data or modify the files on it. Connect your SD card to the computer and do as follows.
1.1. First, please open Command Prompt on Windows 10. To do it, press Windows + R → type cmd in Run dialog → and then press Ctrl + Shift + Enter, at last click Yes in the pop-up window.
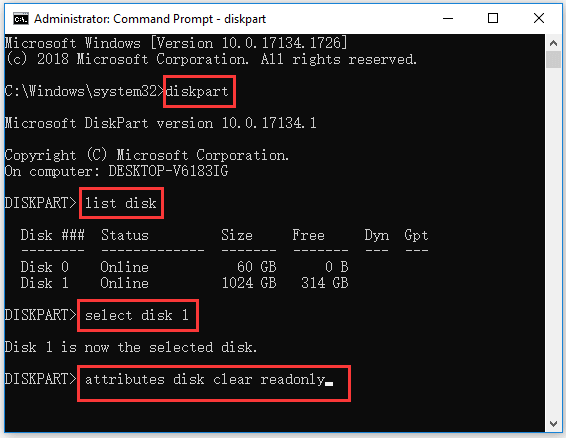
1.2. Now you should open Diskpart tool. Please type diskpart in Command Prompt window → press Enter to open the Diskpart utility.
1.3. See the image below, type the command lines and press Enter after each line to clear write protection on your micro SD card.
list disk (this command will list all the disks on the computer that you are using.)
select disk * (Please remember to replace “*” with the specific disk number of the micro SD card)
attributes disk clear readonly (at last, press Enter)
After you finish all the steps above, you should be able to write data onto the SD card. If your SD card is still write-protected, try other methods below.
Also read: [Solved] External Hard Drive Not Showing Up or Detected
Method 2. Edit Registry to Fix SD Card Write Protected
It’s a priority to back up the registry before you use Registry Editor to fix disk write protected error because it’s dangerous if you make some mistakes when editing the registry. When the backup process is done, you could use an SD card reader to connect the SD card to your Windows PC and begin to turn off write protection on the micro SD card.
2.1. Open Run dialog by pressing Windows + R → type regedit, then press Enter → click “Yes” in the pop-up window to open Registry Editor on Windows 10.
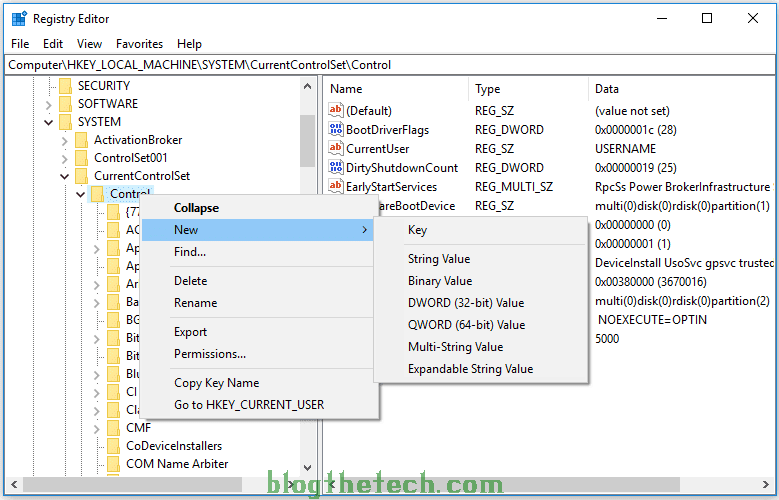
2.2. Please expand the folder in the left panel as the following path: HKEY_LOCAL_MACHINE\SYSTEM\CurrentControlSet\Control → click StorageDevicePolicies folder.
If you cannot see this folder, try this way: right-click Control folder, click New → Key to create a new key named StorageDevicePolicies (see picture below). And then right-click StorageDevicePolicies folder, then click New → DWORD (32-bit) Value to create a new value named WriteProtect.
2.3. In this step, double-click WriteProtect key in the right window → set its value data as 0 → click OK.
2.4. This is the last step, please close Registry Editor window and then restart your computer.
Method 3. Run CHKDSK to Repair a Corrupted SD Card
If your micro SD card is corrupt or has some bad sectors, you will find it is impossible to write any new data on it. To fix the issue, we suggest you to run CHKDSK to check and fix errors.
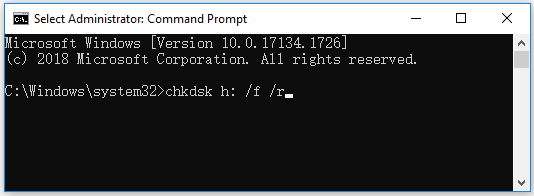
3.1. First, open Command Prompt window in this way: press Windows + R, type cmd, and then press Ctrl + Shift + Enter to run Command Prompt as administrator.
3.2. Next type chkdsk /f /r command with the correct drive letter of the SD card, e.g. chkdsk h: /f /r, and press Enter to run CHKDSK to check and fix errors as well as mark bad sectors on the SD card.
Method 4. Recover Data from Corrupt SD Card
If your SD card comes across errors and some files have gone missing, you had better use the reliable data recovery software to recover files from SD card as soon as possible.
MiniTool Power Data Recovery is a professional data recovery program that can run on Windows computers to effectively recover files from micro SD card, SD card, memory card, external HDD, USB drive, SSD, HDD, etc.
This software can also assist you to recover data from corrupt or formatted SD cards. Download this 100% clean and safe program, connect the micro SD card to your Windows computer and follow the instructions below to see how to rescue data on your SD card.
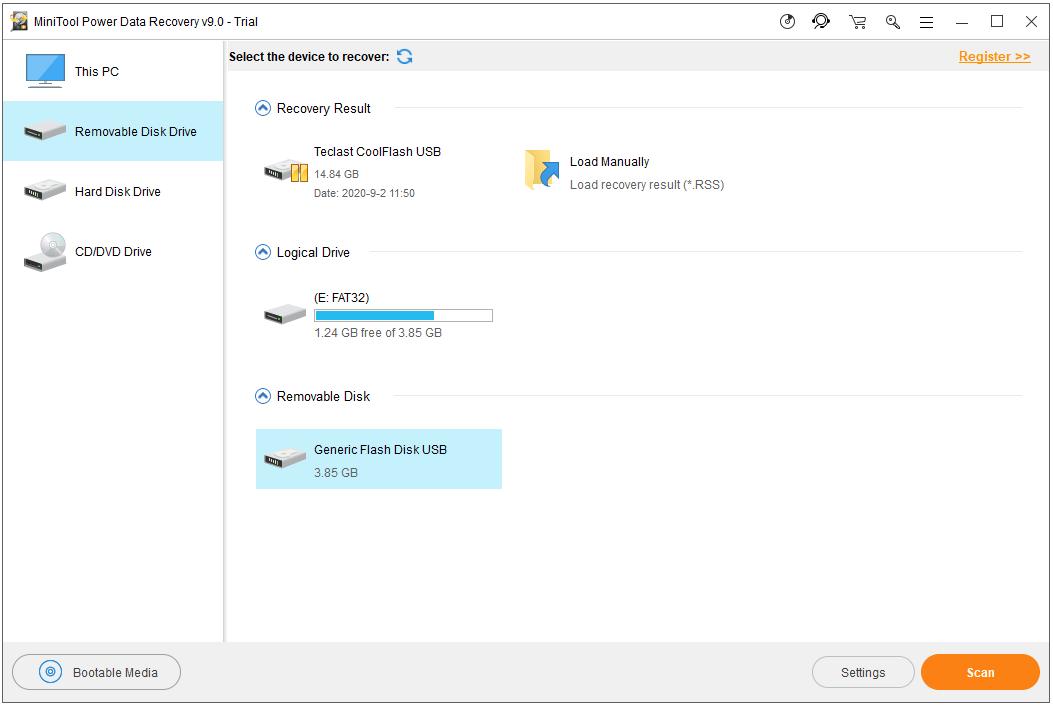
Step 1. Launch MiniTool Power Data Recovery on Windows PC, and select Removable Disk Drive on the left column, then select the micro SD card on the right side, and click the Scan button.
Step 2. When the data scanning process is done, you can check the recovery results to find the needed files, at last, click the Save button to save them to a new place.
Method 5. Reformat the Micro SD or Memory Card
Another way to remove protection from the micro SD card is by reformatting it with an SD card formatter. But before you take action, we recommend you back up all your data. If you lost some important data due to SD card corruption, you can try the above method 4 to recover SD card data first.
Also Read : Easy Way to Recover Files If Your SD Card Become Unreadable
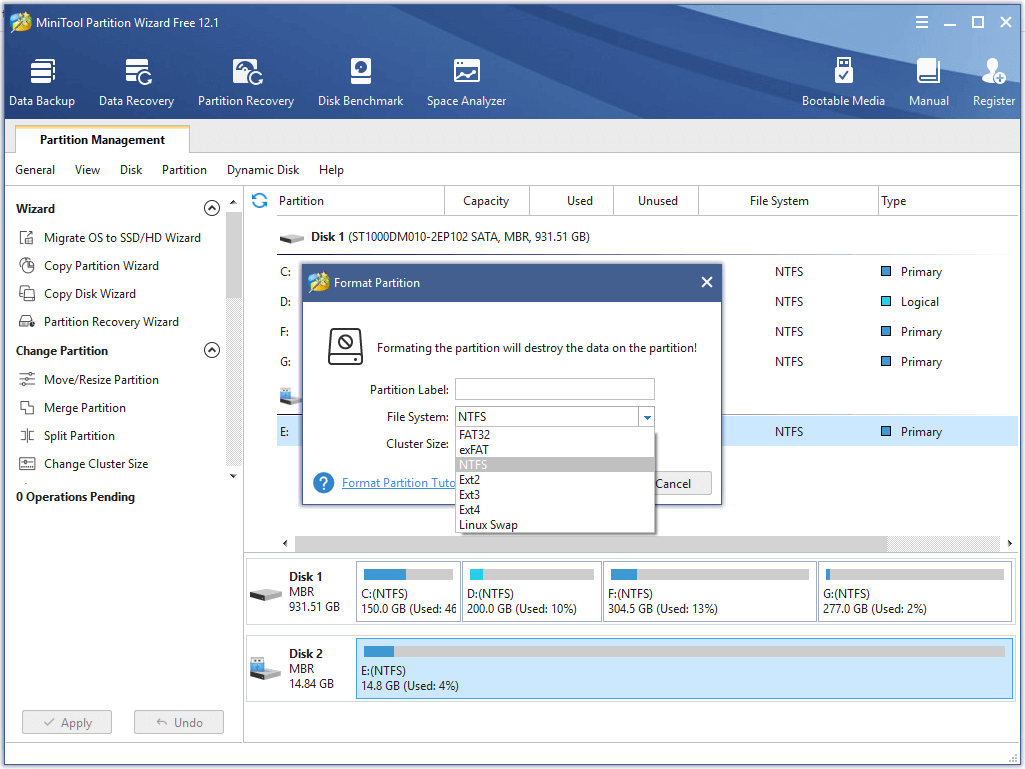
We will take MiniTool Partition Wizard as an example to show you how to format the SD/memory card.
First, connect the SD card to your Windows computer and then launch MiniTool Partition Manager.
Right-click the partition on the SD card and select the “Format” option (see picture below).
Select NTFS or FAT32 as the file system format, and then continue formatting the SD card.